Hard wiring a dual dash cam in a 2014 Nissan Leaf
I've noticed that there aren't too many end-to-end guides to install a dual dashcam system with hard wiring, so I'm combining a guide for doing so with a guide for installing a dash cam in a second gen Nissan Leaf.
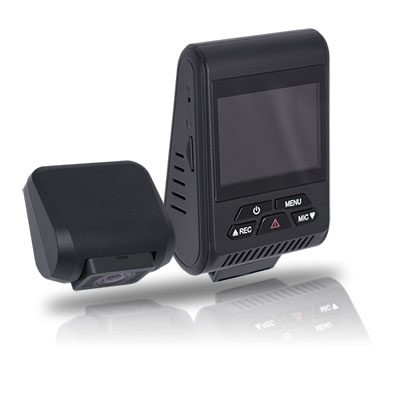
I'm using a Street Guardian SG9663DCPRO (link) with their first-party SGDCHW hard-wiring kit (link).

The dash cam install itself is fairly straight-forward. You can use the included pry bar (or a piece of plastic, or your fingers) to tuck the wiring under the rubber seals and the car's trim to get to the power source. For most people this will be the accessory power socket inside the car. This process is the same for most dash cams and there are many guides on how to do this, including for the Nissan Leaf.
The waters are muddier when it comes to hard wiring a dash cam. Some cams like the one above have a parking mode, which allows them to continuously record at a slower rate when the car is turned off. The accessory power socket does not receive power when the ignition is off, therefore the dash cam must be hard wired into an always-powered circuit (usually by tapping into fuses).
I will be installing this into a 2014 Nissan Leaf, which itself is worth documenting for owners of this car - especially as I will also be running the rear camera wire through to the front.

Hard-wiring the power source
There are three wires to install:- ACC, or accessory, which should only receive power when the ignition is on. This is how the dash cam will know that it should be in park mode or not.
- Battery (+), which will receive power at all times regardless of whether the ignition is on. This will power the dash cam for parking mode. If you're not installing a dash cam with parking mode you probably won't have to install any such wire.
- Ground, which completes the circuit back to the car's battery.
The wiring kit includes fuse taps to make installation easy. In my case I purchased a wiring kit with Mini low profile fuse taps to fit my Leaf but check your vehicle to see what fuses you need. Once we find the circuit we want, we can remove its fuse from the fuse box, plug the fuse tap into its place in the fuse box, then replace the fuse into the fuse tap.
The harder part is figuring out what those circuits are. There are plenty of resources online to figure out which fuse is which in your car - here's mine, but it's also printed inside the fuse box cover. There might be some obvious contenders by just skimming the list of components. We can also use a multi-meter to confirm which circuits are live when the ignition is off vs on.


ACC
The very first fuse on our diagram is for the 20A socket / cigarette lighter circuit - in other words, the exact socket we'd use if we were to just plug into the accessory power socket! We already know that this is only powered when the car is on. Perfect.Battery+
Once again by just taking a moment to think we can determine which circuits are suitable. The interior cabin lights are always usable when the car is off, so let's use them - in my leaf, this is the "10A Interior light" circuit.Here's a shot with the ACC and Battery taps in place.

Ground
This just needs to be attached anywhere on the metal chassis of the car - this feeds back into the negative terminal of the battery. Something was already attached next to the fuse box so I just used the same screw.
I also have a power supply module that came with the kit that I need to secure. I used a 3M fastener strip I had laying around to secure it out of the way. It also has a voltage safety cut off to prevent draining the battery too much if left alone for too long. I set it to the lowest voltage (11.8V) - my reasoning is that the Leaf has a 12V battery and it doesn't have any starter motor that it needs to turn, but I concede that I'm just guessing an appropriate value here, I'm no expert.

Running the cables
I started at the back for the rear camera, roughly following this guy's guide. Using a combination of fingers and pry tool, I first removed the trim from the top of the hatch door, followed by the passenger side trim below the headliner. If you've never done this before the amount of pressure you need to apply to pull these out is a bit scary. Don't worry, they should pop off without damage and will readily pop back in with a firm press.

I then detached both ends of the rubber cable conduit - it has arrows to tell you what direction to pull in and it comes out easy.

The first piece of wire manoeuvring was to get it from the top of the hatch door through the frame to the opening of the cable conduit. I first attempted to insert the cable going in that direction, but found that it kept catching on things as I fed it through, so I instead threaded it going from the conduit end which was much much easier. No tools required. Sorry no photos of this.
Next was to thread the wire through the conduit. My wire's USB plug had a 90 degree in it which made this part a proper bitch. The best advice I have is to massage it through and be patient. This step took me probably 5-10 minutes of massaging before it got through.

The conduit ends can be pressed back into place by just applying force in the reverse direction they came out.
I then pulled the rubber seals down over the passenger doors and worked the cable under the headliner and centre column trim towards the front before letting it sit poking out from the front passenger beam trim. Don't worry about how much force it takes to pull the seals down, they literally want to go back into place. The rear door rubber had actually 100% re-sealed itself when I wasn't looking.


Next up is to run the power cable from the fuse box. The Leaf's fuse box cover clips on very snugly but I found that if I fed the cable out the bottom of the panel and then directly underneath the rubber door seal, I could get it to the same place as the rear camera cable without any of it showing or pinching.


The cables can then be fed under the headliner towards the centre of the windscreen ready to be plugged into the dashcam. There's also a fair amount of space under the headliner for excess cable to be stashed.

Et viola, one working dual dash cam with parking mode and a minimal amount of exposed cable. The cam I bought has some extra stuff to tidy up the visible cables further but I didn't feel the need, I might do something about it later (I won't).


Comments
Post a Comment